Mira Connect Room Licenses
Mira Connect Room Licenses enable features for Mira Connect appliances and software. Room Licenses can be purchased for an organization in Mira Portal or purchased as a license voucher through an authorized distributor and redeemed for a Room License in Mira Portal. Once Room Licenses have been purchased, they can be assigned to rooms within that organization
To purchase room licenses from Mira Portal, you must have administrator or technical permissions on the organization in Mira Portal and you must also have permissions on a billing account. If you created the organization in Mira Portal, you are the Mira Portal administrator. To learn more about Mira Portal permissions and assigning permissions to other Mira Portal users, see our training videos.
License Purchase Steps with Mira Portal
The steps used to purchase prepaid or subscription Room Licenses through Mira Portal and assign a license to a room are shown in the following diagram and described in more detail in this document.

License Purchase Steps from an Authorized Distributor
If you are purchasing prepaid licenses through an authorized distributor, the steps are shown in the following diagram. See the License Vouchers section for how to claim and redeem license vouchers in the desired organization. To redeem license vouchers, you must have at least technical permissions on the organization in Mira Portal in which the voucher is being redeemed. If you created the organization, then by default you have administrator permissions.

What is a Room License
A room license, or more simply, a license, enables features for a room in Mira Portal as summarized in the following table. Licenses can be purchased directly through Mira Portal, through purchase orders to Aveo Systems, or through purchase orders to authorized distributors.
| Feature | Mira Connect Appliance | Mira Connect Software |
|---|---|---|
| Control real equipment | No license required | License required |
| Remote control (UI in remote browser) | License required (first 12 months included) |
No license required |
| Office 365 calendar one-touch dialing | License required (first 12 months included) |
License required |
| Mira Connect Me for control on personal devices | License required (first 12 months included) |
License required |
| Equipment online/offline alerts | License required (first 12 months included) |
License required |
Mira Connect touch panel-based appliances include a 12-month license which is delivered as a license voucher that can be redeemed in Mira Portal for a room license. Since Mira Connect software is a free download, a license is required to control real equipment.

Note that while Mira Connect software requires a license to control real equipment, users can prototype, create, and experience the Mira Connect control system using Mira Connect’s built-in equipment simulators before purchasing a license. Equipment simulators behave like real equipment and allow you to build and test an interactive user interface before purchasing a license or any other equipment.
After one or more licenses have been purchased for an organization, Mira Portal will show the number of licenses, how many are assigned to rooms, and the expiration date of the licenses from the Licenses menu of the organization. Note that licenses are not transferrable between organizations — licenses are purchased for, and used in, a particular Mira Portal organization.

Users can also create and export a report showing the license status for all rooms in the organization by clicking LICENSES REPORT. A license report can be exported to CSV or PDF.
How To Purchase Licenses
Licenses can be purchased directly in Mira Portal from the organization where the licenses will be used or can be purchased from an authorized distributor. To purchase a license, you must have administrator or technical permissions on the organization within which licenses are to be purchased.
Important: If purchasing licenses in Mira Portal, you must purchase licenses from the organization in which you will use the license. Licenses are not transferrable to other organizations in Mira Portal.
To purchase one or more licenses using Mira Portal, click the BUY LICENSES button from the organization’s Licenses menu and follow these steps. To purchase one or more licenses from an authorized distributor, you will purchase a Room License Voucher from the distributor which can be claimed and redeemed as described in License Vouchers.

Purchase Step 1. Select the Billing Type & Quantity
The first purchase step is to select both the billing type and the number of rooms. There are two billing types:
- Monthly and Yearly subscriptions are recurring purchases where at the end of the period, the license will renew automatically, and at the renewal date will charge the credit card associated with the billing account that was used to purchase the licenses.
- Prepaid licenses are a one-time prepaid purchase for one or more years, after which the license expires if not subsequently extended by modifying the license.
These two billing types are designed to accommodate different purchasing preferences customers may have for their AV systems:
- Purchasing a monthly or yearly subscription lowers the initial up-front cost and makes it easy to renew the licenses for multiple rooms in one transaction at the end of the subscription period since the subscriptions are all time-aligned and will be renewed automatically until the subscription is cancelled.
- Purchasing a prepaid license is a one-time upfront purchase for one or more rooms along with one or more years of service for each room. The prepaid license remains active during the selected number of years and you will only be billed once at the time of purchase. Prepaid licenses may be extended at the end of the service, if desired, but they do not renew automatically.
Licenses for multiple rooms may be purchased at the same time by adjusting the quantity of rooms to be licensed. Note you can also change the number of rooms in the future by modifying licenses as described in the Modifying the Number of Licenses section.
If you’d prefer a monthly or yearly subscription, choose the Monthly Subscription or Yearly Subscription option and enter the number of rooms.
Note that your credit card is not charged until after the Step 4. Confirm & Pay step. Prior to that you may click BACK to review and modify previous steps or click CANCEL at any time to end the process before purchasing.
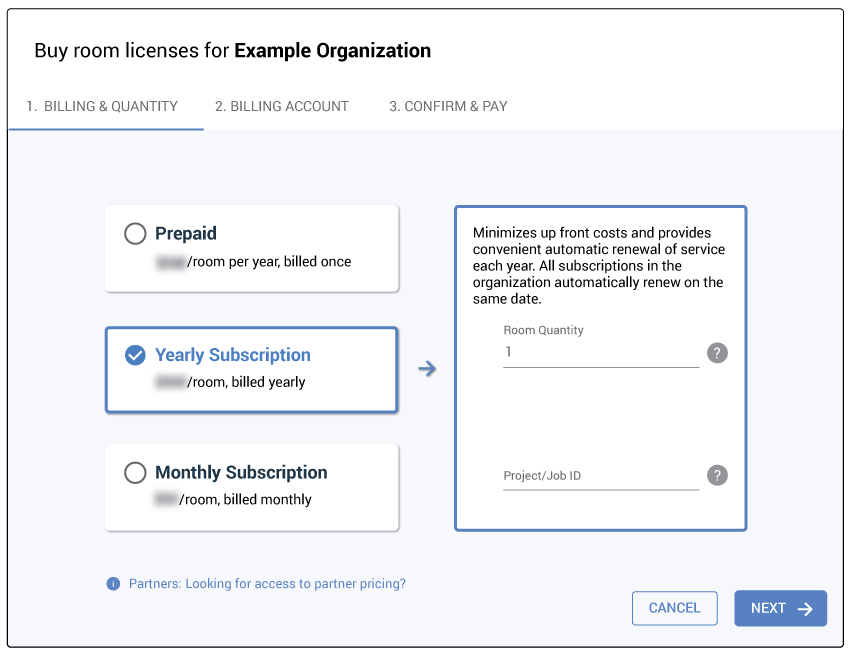
If you’d prefer a one-time prepaid license, choose the Prepaid option and enter the number of rooms and the number of years for each room to be licensed. Since a prepaid license does not renew, it is common to add multiple years of service for each room at the current pricing. At the end of the service term, it is also possible to extend the prepaid license for additional service years at the pricing.
You can also optionally enter a Project/Job ID for this license purchase to make it clearer which project the license was purchased for on the invoice and in Mira Portal.

Purchase Step 2. Create or Select a Billing Account
After selecting the billing type, the room quantity (and the number of years for prepaid licenses), you must either create a billing account or select an existing billing account.
A billing account determines how the license is paid for, and who should receive status information including the invoice, information about license changes, and license expiration notices.
Creating a new billing account
If there are no billing accounts associated with your Mira Portal login, then you must create a new billing account to by a license or to redeem a license voucher. While a billing account can be created by anyone who has at least ‘help desk’ permissions on the Mira Portal organization, a Mira Portal user must have administrator or technical permissions on the organization to purchase a license for that organization. If you only have technical permissions on a site, you will not be able to purchase licenses for an organization.
Enter a billing address that matches the billing address for the payment method to be added in Step 3. Add a Payment Method.

Note that the Billing Account’s billing address must be the billing address for the credit card entered in Step 3.
Additional billing email addresses can be entered for other team members that should receive the invoice information, as well as license update, expiration, and renewal messages.
Because a billing account can be used to buy licenses across multiple organizations within Mira Portal, an integrator typically won’t want to add an end-user’s email address as an additional Billing Email contact unless the end-user is purchasing the licenses or is the sole client for a particular billing account.
Note that all Email addresses entered will receive the invoice and renewal information, which includes the purchase and renewal pricing information for the licenses.
Using an existing billing account
If you have previously created a billing account, or have been given permissions on an existing billing account, select the desired billing account for purchasing the license.
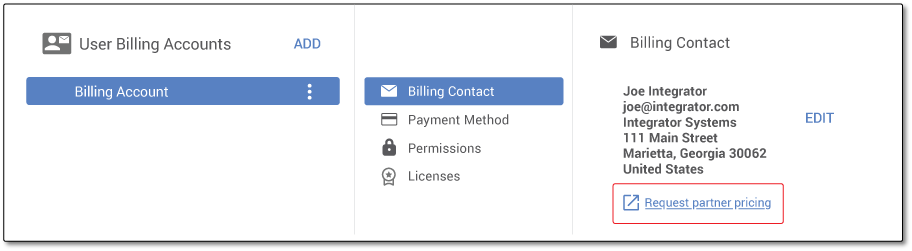
If you are an Aveo Systems authorized partner and the pricing shown in Step 1 differs from the pricing in our partner price catalog, click the Request partner pricing link to request partner pricing for this billing account.

Request Partner Pricing
Clicking the Request partner pricing link will open a Google form and prompt you to enter the requested partner information. The Google form requires that you log into a Google account because you must log in before being able to upload documents. Note there is an option to upload a valid reseller certificate to associate with your billing account.
Most of the fields will be pre-populated with information from your Mira Portal account and the billing account.
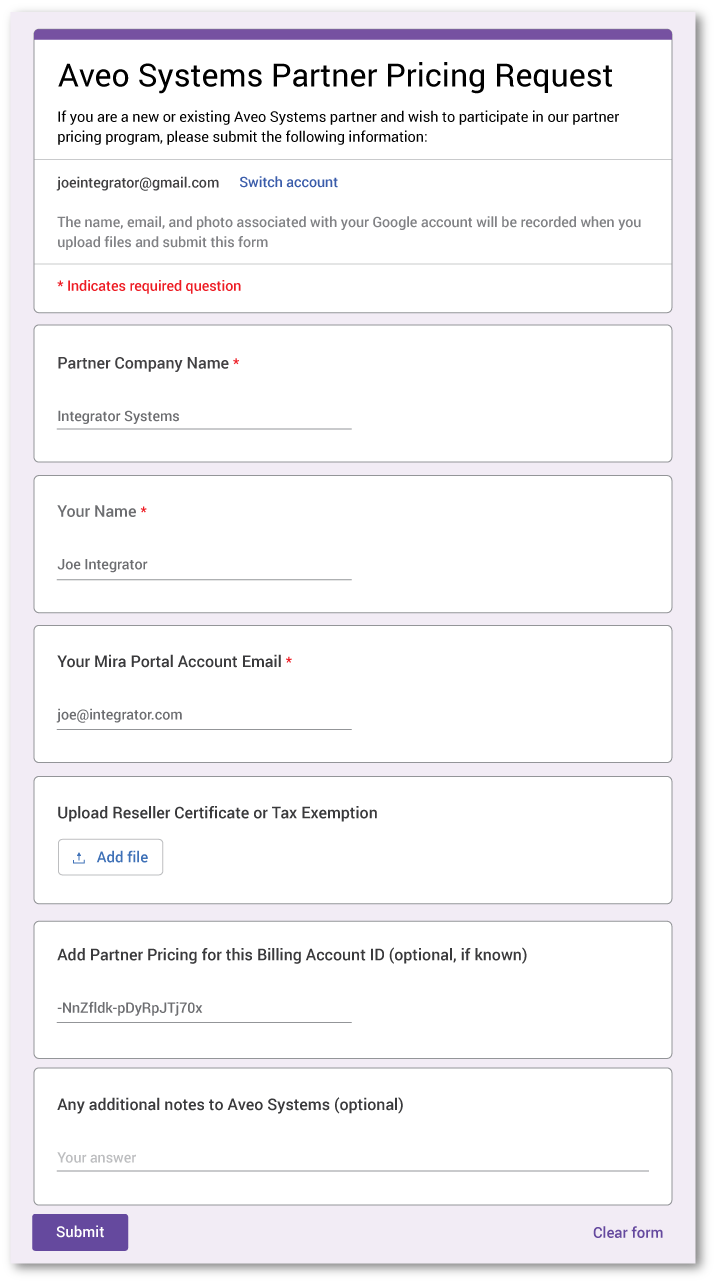
Once the fields have been filled out and a valid resale certificate uploaded, click Submit. Aveo Systems will review the information and notify you if partner pricing is approved for this billing account.
Note that approving partner-pricing requests may take several business days.
A best practice, if you are a valid reseller, is to create a billing account and request partner pricing before your first license purchase.
If partner pricing has been approved, it is not necessary to request partner pricing again for future purchases using this billing account unless your resale certificate has expired.
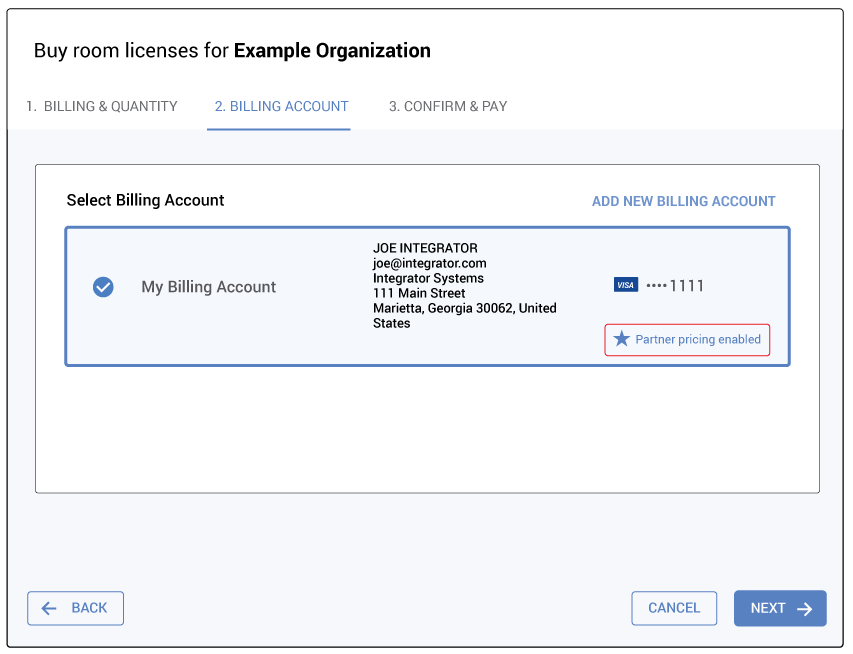
Once partner pricing is approved, your billing account information will update as shown in the following figure with the text Partner pricing enabled. If you go back to Step 1 in the license purchase process, the pricing for the different billing types will reflect the current partner pricing.
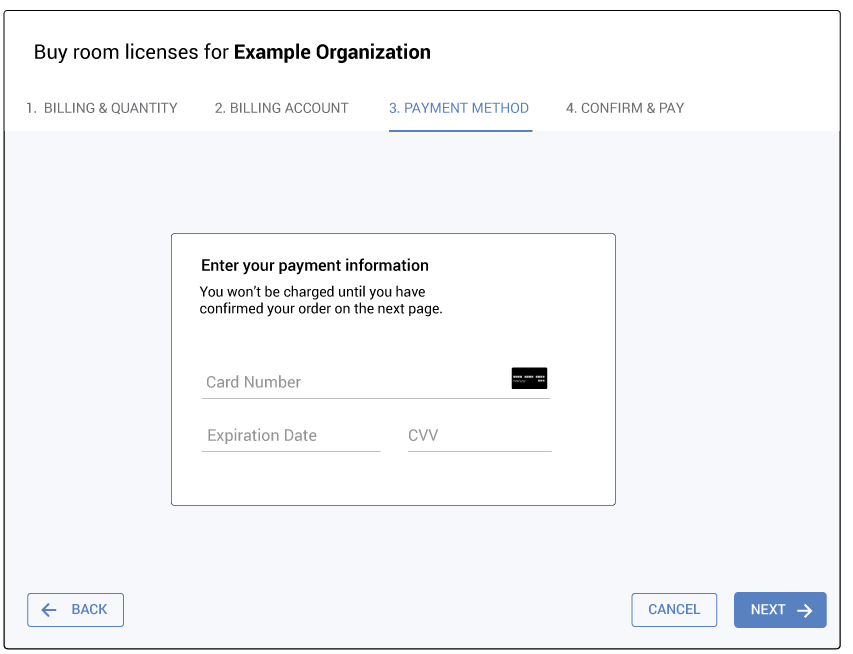
Purchase Step 3. Add a Payment Method
Once a billing account has been created, you will be prompted to enter a credit card that will be associated with the billing account and used for purchasing the license(s). Future purchases with the same billing account will not require re-entering credit card information. Credit card information is not stored in Mira Portal — it is stored securely with our payment processor.
The credit card is not charged at this step. This will only happen after you’ve reviewed the charges in Step 4. Confirm & Pay.
Purchase Step 4. Confirm & Pay
The final step in the checkout process allows you to confirm the number of rooms, the number of service years, and the final amount, before paying for the licenses. Note that new licenses that modify existing licenses may be prorated in duration and cost to time-align the licenses to have one renewal or end date. See Additional License Purchases are Pro-Rated for a prorating and time-align example.
Clicking the PAY NOW button will charge the credit card associated with the billing account.
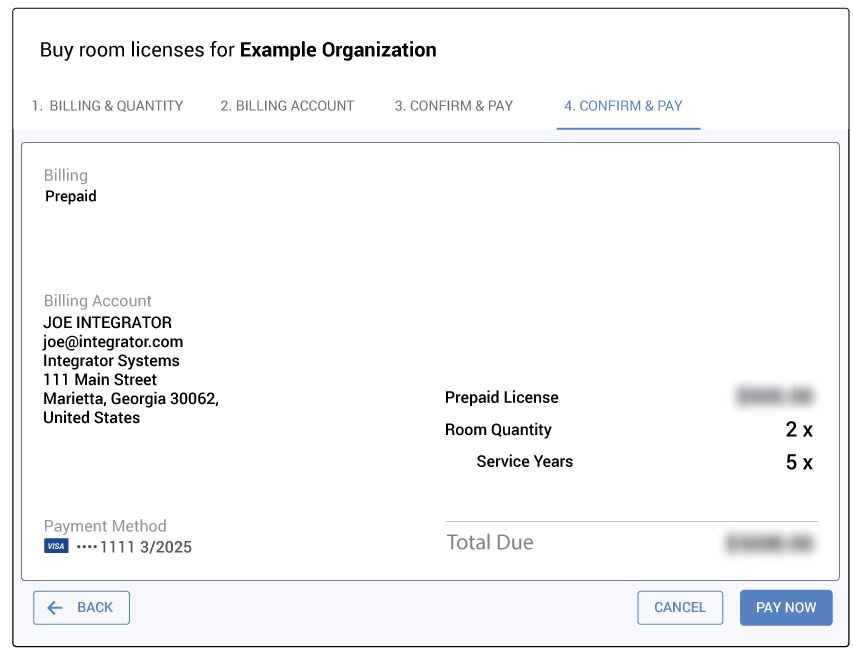
Once one or more licenses have been purchased, a confirmation email with the invoice information will be sent to the purchaser and also to any additional billing contacts entered when creating the billing account.
A message will appear in Mira Portal confirming the purchase.

Once one or more licenses have been purchased, the set of licenses are delivered electronically to your Mira Portal account and appear in the organization’s Licenses menu. Licenses are active immediately, and are ready to be assigned to rooms and used.
Note: Licenses become active as soon as they are purchased for the organization through Mira Portal.
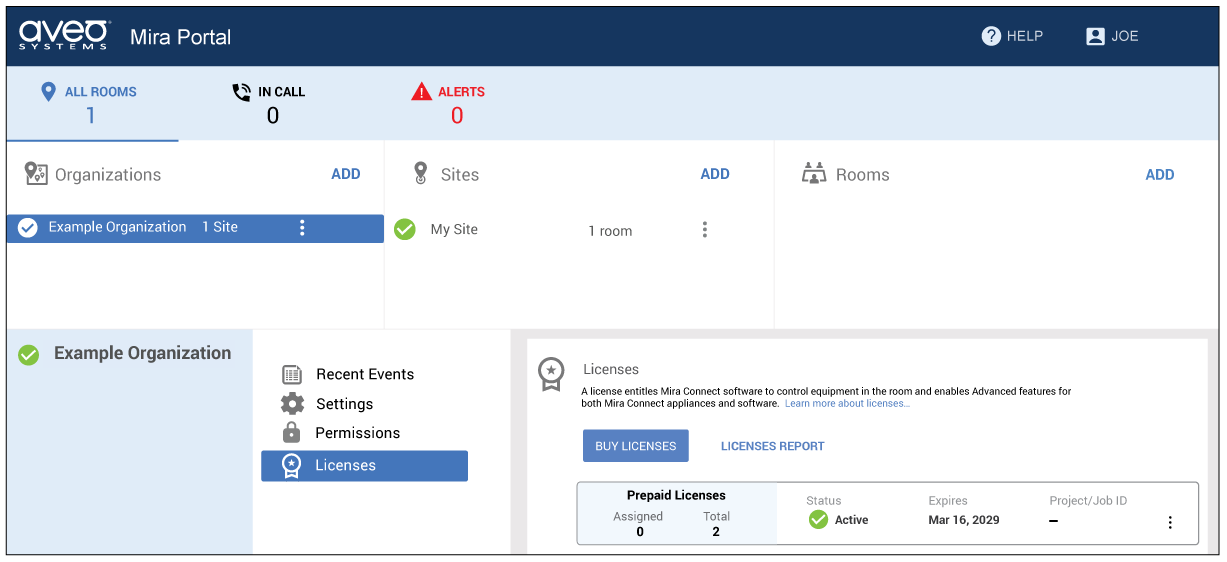
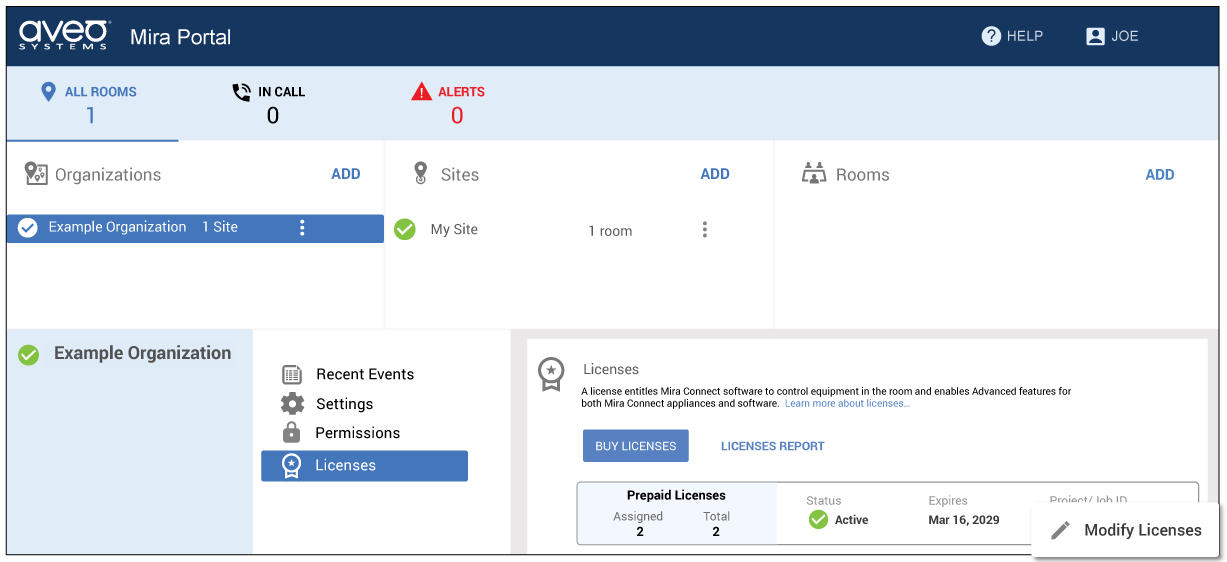
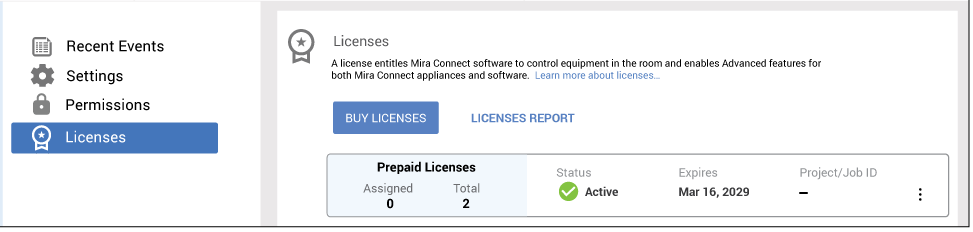
On the organization’s Licenses menu, you can see the number of purchased licenses, the number of assigned licenses, and the expiration date for the licenses.
As shown in the following figure for this example, two prepaid licenses were purchased at the same time, and the set of licenses is shown in the organization in Mira Portal along with the expiration date for the licenses. No licenses have been assigned to rooms yet.
Billing Accounts
Billing accounts make it easy for users to purchase licenses and to receive invoices and renewal information for recurring subscriptions.
Additional contacts can be added to the billing account contacts to send purchasing and renewal notifications to others in your company.
Additionally, the ability to purchase licenses from a billing account can be shared with other people within a company by assigning billing permissions to other Mira Portal users as described in this section.
As different partners may purchase licenses for a particular organization, Mira Portal allows having more than one billing account for purchasing for a Mira Portal organization. During the purchase process you must select from the billing accounts you have permissions to use, or you can create a new billing account. Typically a partner only requires one billing account.
Once licenses have been purchased using a particular billing account, the licenses are ‘owned’ by that billing account. Modifying a set of licenses to add more rooms or years of service requires having permissions on the billing account that initially purchased the licenses.
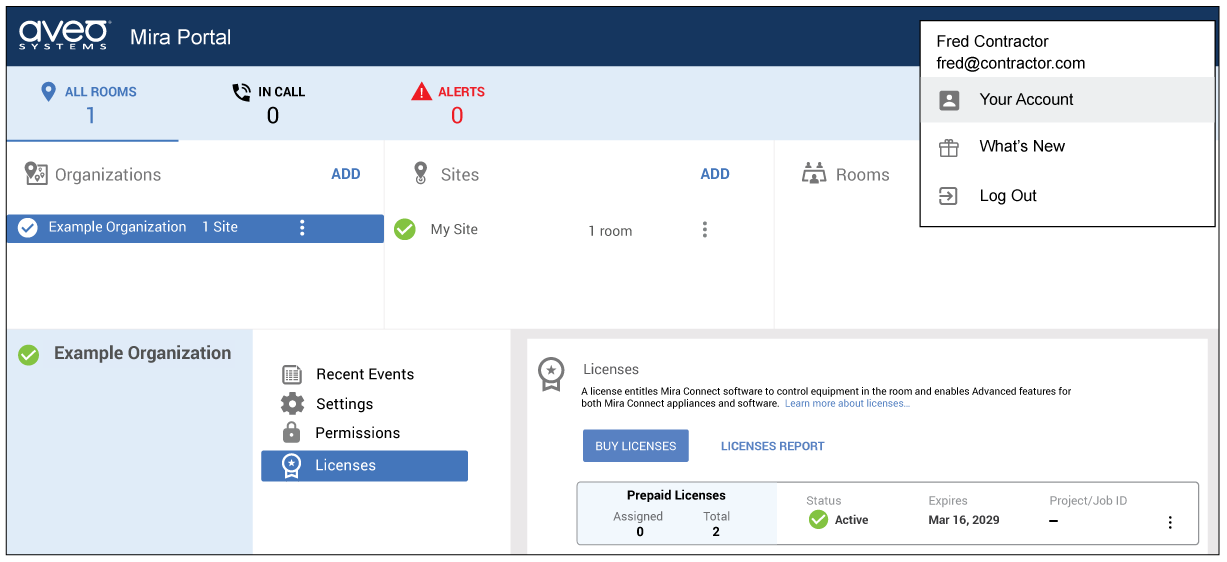
To modify a billing account, navigate to your account settings in Mira Portal by clicking your username in the upper right hand corner and selecting Your Account as shown in the following figure.

Adding Billing Account Email Addresses
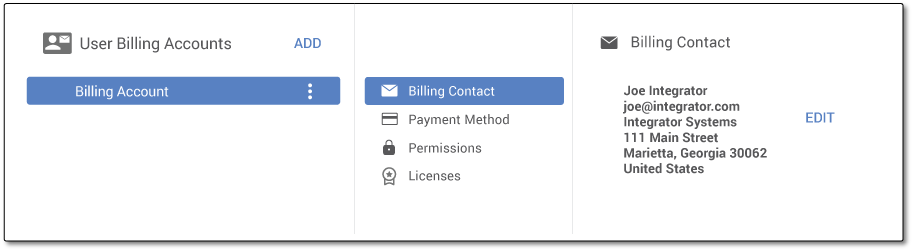
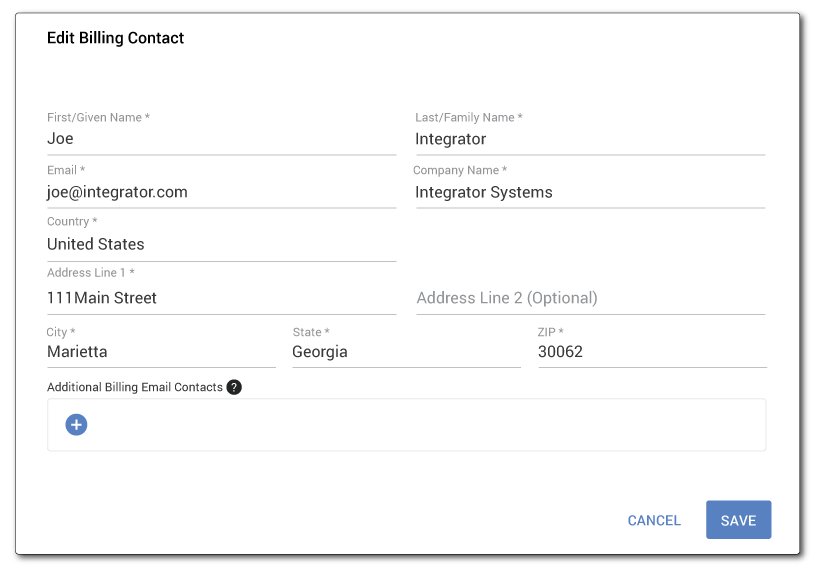
To send notifications of license renewals and purchases to additional contacts on your team, edit your billing account, select Billing Contact, and click EDIT.
Additional contacts do not need a Mira Portal account — they just need an email address to receive notifications.
Click the ‘+’ in Additional Billing Email Contacts to add one or more email addresses.
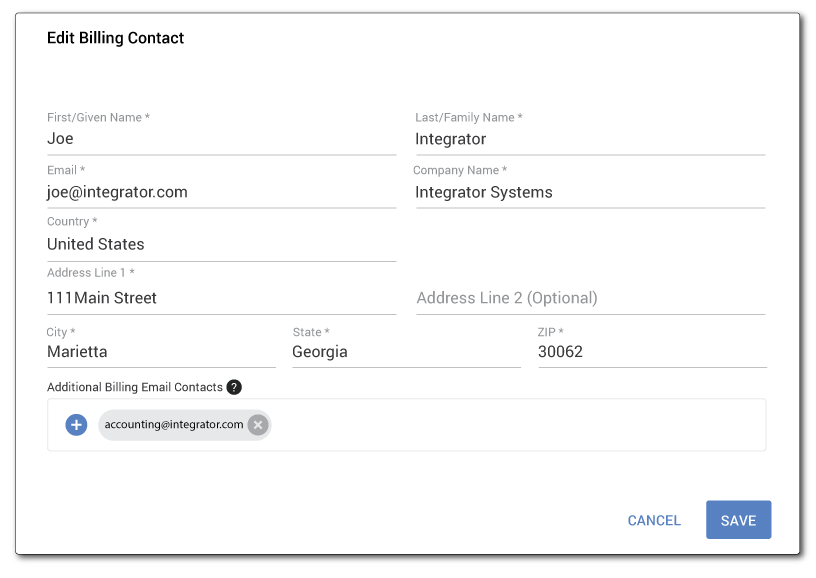
Enter one or more billing contact email addresses for where to send license purchase information and notifications about renewals, etc. In this example, the email address accounting@integrator.com was added so they could receive a copy of all notifications for this billing account.

The billing account contact information will be updated with the additional contact’s email address.
To remove an additional contact, click the gray ‘x’ next to the email address.
Click SAVE to update the billing account information.
Licenses purchased with this billing account will send invoices and renewal notifications to joe@integrator.com and to any additional billing email contacts that have been added.
Note that the additional contacts will receive notifications about license purchases and renewals. To allow other Mira Portal users to purchase licenses with a billing account, see the next section about changing billing account permissions.
Changing Billing Account Permissions
If you want other people from your team, who have administrative permission on this organization in Mira Portal, to be able to purchase licenses using your billing account, you can assign billing account permissions for them to use this billing account.
Note that billing account permissions are different from Mira Portal organization or site permissions. By default, the Mira Portal user who created a billing account is the only person who can purchase licenses using that billing account.
To add permission for others to use your billing account, select the desired billing account, click Permissions, and then click ADD to add other Mira Portal users to be able to use this billing account.

There are two billing permission levels supported:
- Purchasing allows the user to use this billing account to purchase licenses.
- Billing Administrator includes Purchasing permissions and also allows the user to assign billing permissions to others.
To assign permissions to another user, the current user must already have a Mira Portal account and be a billing administrator. Enter the new user’s email address which must correspond to the email they used when creating their Mira Portal account. If the new user doesn’t have a Mira Portal account, you cannot assign billing permissions to them until they create a Mira Portal account.

A best practice is to assign Purchasing billing permissions instead of Billing Administrator permissions to others you’d like to be able to purchase licenses from your billing account. A billing account can purchase licenses for any organization within Mira Portal that the user has administrator permissions for.
Emails about license renewals will be sent to users who have permissions to use the billing account and also to additional contacts who want to know about license renewals but don’t need to purchase licenses.
Changing a Payment Method
You can also change the credit card associated with any billing account that you have administrative billing permissions on. Changes to the payment method will be applied to all subscriptions that use this billing account. This means that all subscriptions created using this billing account will renew using the new payment method at their future renewal dates.
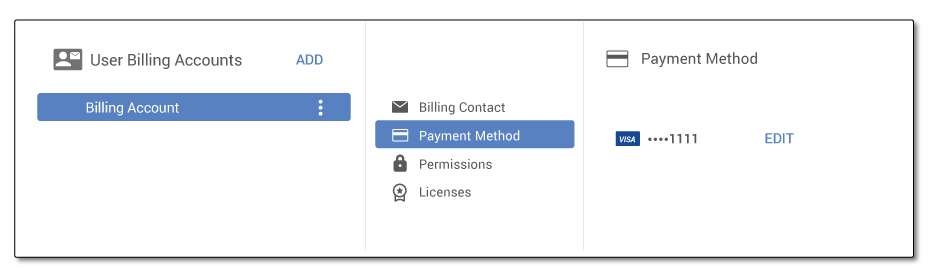
To change the payment method, click Payment Method from the selected billing account.
Next, click EDIT to show part of the current card information and then click ADD NEW PAYMENT METHOD to add information about the new credit card. Note that no credit card information is stored on Mira Portal. Instead, the information is stored securely with the payment processor used by Mira Portal.
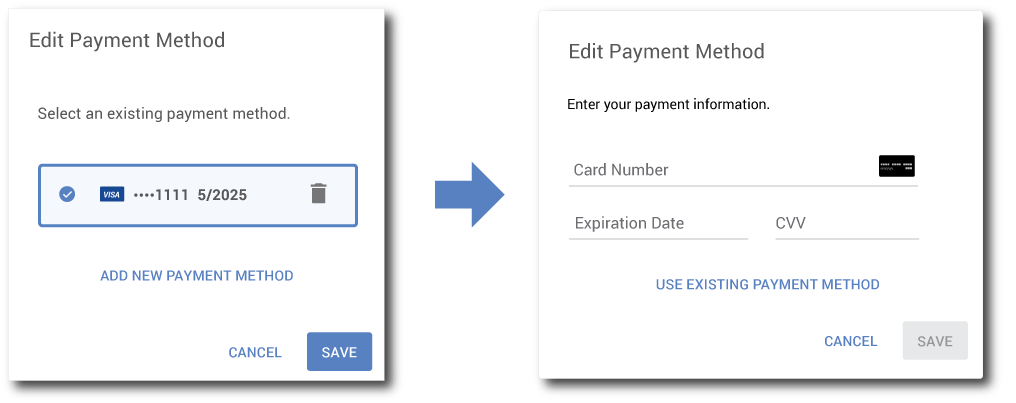
Once valid credit card information has been entered, click SAVE to update the payment method. The SAVE button only appears after valid values have been entered for all fields.
Licenses Purchased with this Billing Account
Licenses that have been purchased using this billing account for any Mira Portal organizations are summarized on the licenses tab.

Creating a New Billing Account
If you need to purchase licenses for a room but don’t have billing permissions on existing billing accounts, you must either request permissions on an existing billing account or create a new billing account before you can purchase new licenses for an organization.
If you are a new partner adding new rooms to an existing installation where a previous partner had purchased licenses, you must create a new billing account since you won’t have permissions on an existing billing account that was created by a previous partner.
While you will be prompted to create a new billing account during Step 2: Creating a Billing Account, you can also do this manually by navigating to your account settings in Mira Portal.
If you don’t have permissions on other billing accounts, you won’t see that there are any billing accounts available.
From your account page, click the ADD button adjacent to User Billing Accounts.

Enter the new billing account information and click SAVE.

Once done, edit the payment information to enter a new credit card as described in the Changing a Payment Method section.
Note that if you are an authorized Aveo Systems partner, you can click the Request partner pricing as described earlier in this document. You only need to request partner pricing once per billing account since a billing account can be used to purchase licenses for multiple organizations in Mira Portal.
A billing account may be renamed by clicking the three dots next to the billing account name and choosing Edit.

Once you have changed the name, click UPDATE BILLING ACCOUNT to save the new name.

Requesting Partner Pricing
You can request partner pricing directly from your billing account. Since a billing account can be used to purchase licenses for any number of organizations within Mira Portal, you only need to request partner pricing once per billing account.
To request partner pricing, click the Request partner pricing link on your billing account.
Requesting partner pricing will prompt you to enter additional information about your company which will be forwarded to Aveo Systems for review.
If you are a valid reseller and partner pricing has been approved, you will receive an email notification and your billing account will indicate that partner pricing is enabled as shown in the following figure.
When purchasing licenses, the pricing shown will reflect the current partner pricing.

Additional License Purchases are Pro-Rated
After one or more licenses have been purchased with a specific billing account, the set of licenses can be modified at any time to increase or decrease the number of licenses for the organization when using the same billing account.
Modifying a license to increase the number of rooms (or years of service) will update the existing set of licenses. The new licenses will have the same expiration date as the original set of licenses and will have a pro-rated cost based on when the additional licenses are purchased relative to the current license renewal date.
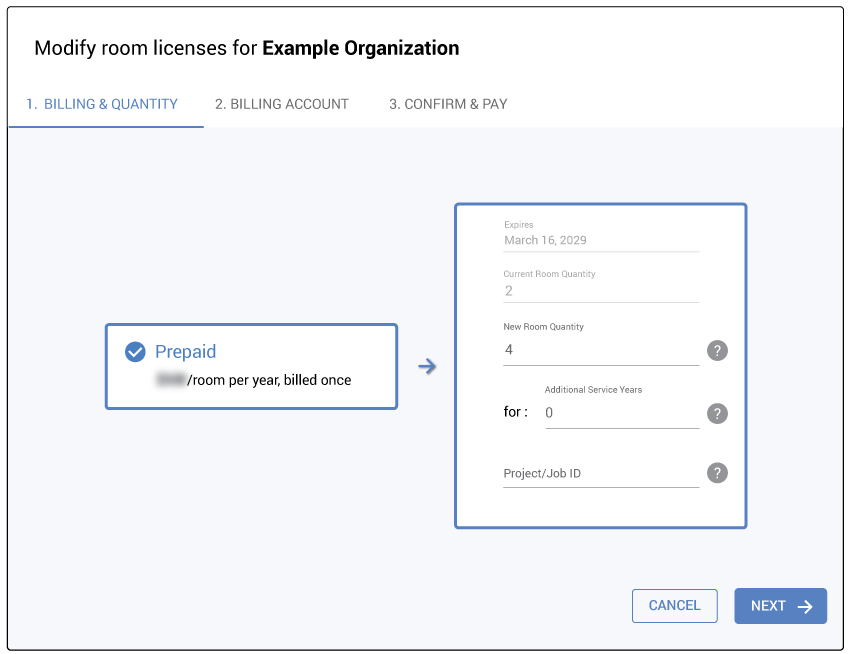
In this example, we’re modifying an existing prepaid license for 2 rooms to add 2 new rooms for a New Room Quantity of 4. Because the original license billing type was prepaid, the prepaid option is the only option shown for modifying the license. If you’d like to add additional service years to all the licenses, you can also adjust the Additional Service Years value.
Click next to select the billing account and then finally to confirm and pay. The total amount to pay is pro-rated based on the date of purchase and the current expiration of the initial licenses.
Maintaining the same expiration date for multiple licenses simplifies license management and the renewal process because there is only one date to track and one purchase to make when it’s time to renew subscriptions or extend prepaid licenses.
Pro-Rating Example: Staging License Purchases
Because licenses become active once they are purchased for an organization, if you need licenses for multiple rooms but the installation for multiple rooms is staggered over time, a best practice is to purchase only the number of licenses you need initially, and then modify the organization’s set of licenses to add licenses when you need more.
As described in the previous section, the cost for subsequent license purchases are pro-rated to the remaining duration of the original license, so that all licenses will have the same expiration date. In this way, only the rooms that require active licenses have them, while rooms that haven’t been installed yet won’t have an active license until they need it. Mira Portal keeps the same expiration date for the set of licenses to simplify management and future purchases.
As an example, let’s assume you want three yearly subscription licenses but know that each room will take one month to install. Since you don’t want to waste unused license time by purchasing three licenses at once, you can stagger the purchases as follows:
- When the first room is ready for testing with real equipment, purchase one license for a cost of $ N.
- One month later when the second room is ready to be tested, modify the first license to add a second room. Because the expiration dates for the second license will be aligned with the first license, the cost of the second license will be 11/12 of the cost of the first license since the second license was purchased one month after the initial license and has a duration of 11 months.
- Similarly, another month later when the third room is ready to be tested, modify the license again and add a third room. The additional cost for the third room is now 10/12 of the cost of the first license because it has the same expiration date as the first license but was started two months later and has a duration of 10 months.
The staggered purchase sequence for this example is shown in the following figure.

A summary of the license purchases are shown in the following table assuming the first license was purchased Feb 1, 2024 and subsequent licenses were purchased a month and two months later. If different purchase dates were used for the second and third license purchases, because you need the licenses sooner or later, the pro-rated cost would change accordingly.
| License Purchase | Purchase Date | Cost | Expiration Date |
|---|---|---|---|
| First | Feb 1, 2024 | $ N | Feb 1, 2025 |
| Second | March 1, 2024 | $ N x (11 / 12) | Feb 1, 2025 |
| Third | April 1, 2024 | $ N x (10 / 12) | Feb 1, 2025 |
| License renewal | |||
| 3 Licenses | Feb 1, 2025 | $ N x 3 | Feb 1, 2026 |
In this example, the first year’s subscription cost is $ N + (N * 11 / 12) + (N * 10 / 12) = $ N x 2.75.
At the renewal date, Feb 1, 2025 in this example, the cost to renew 3 rooms will be $ N x 3, as all licenses will renew for a full 12 months.
Assigning a License to a Room
Once licenses have been purchased for an organization, they may be assigned to rooms. To assign a license to a room, navigate to the room’s Licenses menu in Mira Portal and click the ASSIGN LICENSE button.

Next, select the set of licenses from which to assign a license to this room. While the set of licenses may include more than one license, only one room license is used per room.

Once you’ve selected which collection of licenses to use, click ASSIGN LICENSE to assign the license to the room. Mira Portal will show the license assignment in the room, as shown in the following figure.

The organization’s Licenses menu will show the updated count of assigned licenses reflecting that a license has been assigned to a room.

Releasing a License from a Room
Once assigned to a room, a license can be released from a room so that it can be used in a different room within that organization.
To release a license from a room, navigate to the room, click the 3 dots next to the license, and choose Release License.

Mira Portal will show a warning if removing the license will affect the operation of the room.
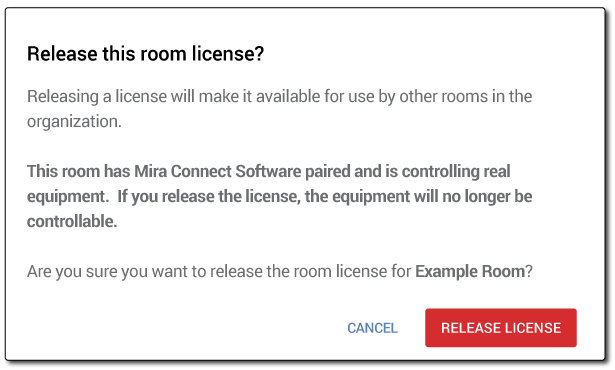
Once released, the room no longer has the functionality that was enabled by the license. For rooms using Mira Connect Software, this means that real equipment can no longer be controlled in the room that no longer has a license.

After releasing a license from a room, the total number of licenses in the organization will stay the same, while the number of assigned licenses in the organization will be reduced by one immediately.
Extending Licenses
Prepaid licenses can be extended to add more rooms or more years of service. Recurring monthly or yearly licenses can be extended to add more rooms, but don’t need to be extended in duration as they already renew automatically.
To see if licenses need to be extended, you can review when your organizations’ prepaid licenses will expire, by navigating to the organization’s licenses in Mira Portal.
Log into Mira Portal and navigate to the organization’s License menu on your Mira Portal dashboard to review the number of licenses and their expiration dates.
Create a Licenses report by clicking the LICENSES REPORT link to review which rooms are licensed and when the licenses will expire.
If a set of Room Licenses in the organization are expiring soon, and the features enabled by the Room License are still desired, you can extend prepaid Room Licenses before the expiration date if you have permissions on the billing account used to create the existing set of licenses.
To extend a set of licenses, modify the existing set of prepaid licenses by clicking the three dots to the right of the license and selecting Modify Licenses to add one or more years of service to prepaid licenses or to add more rooms to subscriptions.
If you don’t have permissions on the existing billing account, you will need to create a new billing account, request partner pricing (if you are a partner), and then purchase new licenses to replace the expiring licenses. Once the new licenses have been added to the organization, follow the instructions for assigning licenses to the appropriate rooms. A request for partner pricing may take several business days for a response.
Modifying the Number of Licenses
If an organization needs additional licenses after the original license purchase, the original license purchase can be modified to increase the number of rooms if you have billing account permissions.
For prepaid licenses, the number of service years may also be increased for all rooms. Note that the original billing account used to create the initial purchase must be used to extend existing licenses.
If you don’t have permissions on the original billing account used to purchase the current set of licenses, then you must create a new billing account and purchase new room licenses instead of modifying the existing room licenses. A new billing account must be created because you can’t use someone else’s billing account (and their payment information) to purchase licenses if you don’t have permissions on their billing account.
If you don’t have permissions on the original billing account used to purchase the current set of licenses, then you must create a new billing account before purchasing additional licenses.
As described earlier, the purchase price for adding licenses to an existing license is pro-rated to maintain the same expiration date for all licensed rooms within the organization. Aligning the expiration dates to one date provides clarity for when licenses renew and what the cost will be upon renewal.
When you create a new billing account and buy new licenses, the new licenses are not time-aligned with licenses purchased under a different billing account for the organization. New licenses have their own start date. Additional license purchases using the new billing account will be time-aligned to other purchases from that billing account for organization.
Reducing the Number of Licenses
You may also reduce the number of unassigned licenses so you are not billed for them upon your next renewal. When reducing the number of licenses, you can only reduce the number of licenses by up to the number of unassigned licenses in the organization.
For example, if you have 100 licenses in an organization and all are assigned to rooms, you can’t reduce the number of licenses until you have released licenses from one or more rooms. See the Releasing a License from a Room section for how to release a license.
When reducing the number of licenses, the number of licenses available in the organization is reduced effective immediately. A best practice is to reduce the number of licenses just before the renewal date or expiration date of the license to ensure you are getting maximum use of the license before removing it.
Important: Reducing the number of licenses will remove licenses from the organization immediately and cannot be undone.
Stop a Subscription from Renewing
If recurring subscriptions have been purchased for the organization, they will continue to renew until they are cancelled or until the billing account can no longer be successfully charged.
Cancelling a subscription stops the subscription from renewing at the next renewal date and stops any future charges for this license from being made using the billing account. Since the subscription was already paid for when a user chooses to cancel the service, the features associated with the license remain active until the next renewal date.
To stop a subscription from renewing, click the three dots next to the subscription in the organization’s Licenses menu and click Cancel Subscription.

A confirmation window will appear and indicate that the subscription will be cancelled as of the next renewal date. To confirm cancelling the subscription, click CANCEL SUBSCRIPTION.

After confirming cancellation, the organization’s Licenses menu will show the updated license status with the Will Cancel date indicating when the licenses will no longer be active.

If you change your mind before the Will Cancel date, it is possible to restore the subscription by ‘removing the cancellation’ by editing the license.
License Vouchers
If you purchased a prepaid license, or received an evaluation license, for one or more rooms from Aveo Systems or an authorized Aveo Systems distributor, you will have received a license voucher either directly in your Mira Portal account or via email.
Claiming a Voucher
If you received an email about the voucher, open the email and click the claim voucher link to associate the voucher with your Mira Portal account. If you don’t have a Mira Portal account, you must create one to claim the license voucher. If you do have a Mira Portal account, log in to your account.
If the voucher was sent directly to your Mira Portal account, then you will see that a voucher is waiting for you when you log in to Mira Portal.
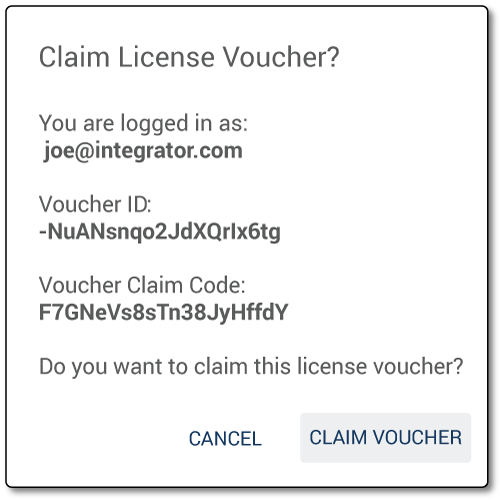
You can claim the voucher by clicking the CLAIM VOUCHER button. Claiming a voucher does not activate the license associated with the voucher. Licenses from vouchers are not activated until when they are redeemed as described next.
Once the voucher has been claimed, the voucher will appear under your PURCHASES tab in your Mira Portal account. In this following figure, a voucher for 2 room licenses, each with 2 years of service, was purchased and is associated with this Mira Portal account.

Once the voucher is associated with your Mira Portal account, you can transfer that voucher to another person who may be doing the work in Mira Portal for this installation, or you can redeem the voucher yourself.
Transferring a Voucher
To transfer the voucher to another user, click Transfer Voucher…
A Transfer License Voucher window will appear where you can enter an email address of the user to whom you’d like to transfer the voucher. If the user has a Mira Portal account, the voucher will be transferred directly to their Mira Portal account after clicking TRANSFER VOUCHER.
Mira Portal automatically checks whether the entered email address corresponds to a valid Mira Portal account. In the next figure, Mira Portal reports: Mira Portal account found! and will transfer the voucher to the user’s Mira Portal account.
If the user does not yet have a Mira Portal account, the Transfer License Voucher window will report: Mira Portal account not found. If there is no Mira Portal user found, then the voucher, including a link for claiming the voucher, will be emailed to the specified email address when the EMAIL CLAIM CODE button is clicked.
After confirming the email address, click EMAIL CLAIM CODE.
Redeeming a Voucher
Redeeming the voucher will convert the voucher into a license within the selected organization and make the license active.
To redeem the voucher click Redeem Voucher… for the selected voucher in your Purchases area.

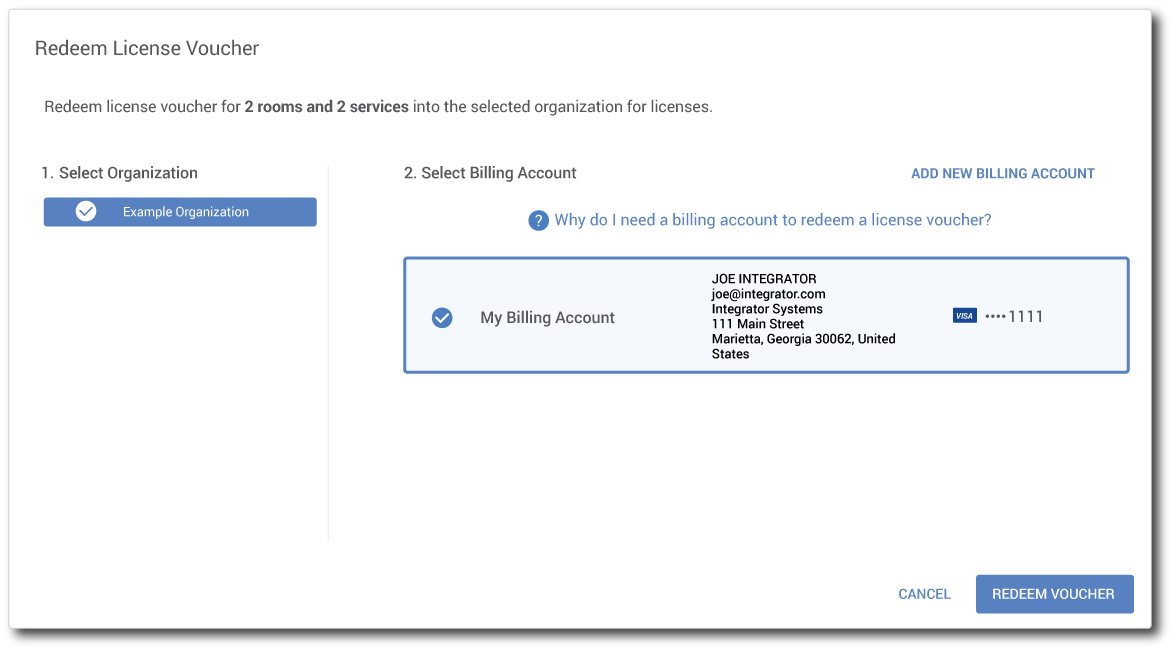
Redeeming a voucher requires selecting which organization will receive the redeemed the voucher and entering contact information for a billing account to associate with this license. You must have either administrator or technical permissions on the organization to redeem a voucher into the organization.
In the first step, select the organization to which the licenses should be assigned. In the second step, you must also select an existing billing account or create a billing account to associate with this voucher.
If you purchased your license vouchers through an authorized distributor, you’ve already paid for the vouchers through you distributor. In this situation, the billing account does not need any payment information. You will not be charged anything to redeem license vouchers.
The billing account will be used to send email notifications about license status or expiration.
Once a billing account has been selected, click REDEEM VOUCHER.
In this example a credit card is associated with this billing account, but is not used when redeeming a voucher.
Before the voucher is redeemed for a license, there is a final confirmation step since this step cannot be undone.
Review the information, and once the redemption is confirmed, click REDEEM VOUCHER.

Once the redemption is confirmed, the voucher is converted to a license and the license is assigned to the organization and becomes active. In this example, Example Organization was the organization selected to receive the license.
Once the voucher has been redeemed to the organization, the set of licenses are now ready to be assigned to rooms. See the Assigning a License to a Room section for how to assign a license to a room.
Important: Once a voucher has been redeemed, the license becomes active and the service interval begins.

A report of current license assignments can be viewed by selecting the LICENSES REPORT.
Summary
Mira Connect Room Licenses enable features for Mira Connect appliances and software. Licenses are purchased for a Mira Portal organization and can then be assigned to rooms within that organization.
Room licenses have been designed to make it easy for you to purchase, assign to rooms, and modify for additional rooms or service years.
By supporting two license billing types — Monthly and Yearly Subscriptions or Prepaid licenses — customers can purchase licenses either on an ongoing basis with low upfront cost or as a one-time purchase for the specified number of rooms and service years. The number of services years can be extended in the future if you need additional service years for prepaid licenses.
Glossary of Terms
Billing Account - A billing account stores information about who is buying a license or who is redeeming a voucher. There are administrator and purchasing permissions that can be assigned for a billing account to allow multiple users to purchase licenses with a billing account. A billing account is required to buy one or more licenses directly in Mira Portal and also to redeem a voucher. The billing account contact information is used for sending invoice and payment information, notifications about expiring licenses and upcoming subscription renewals.
Claim code - When a license voucher is sent via email to a user who does not yet have a Mira Portal account, a claim code is associated with the license voucher. If multiple people received voucher via email, the first person to claim the code will associate the voucher with their Mira Portal account. Once a voucher has been claimed by a Mira Portal user, it is available in the Mira Portal account to be redeemed.
License Voucher - A virtual coupon that can be redeemed for a set of prepaid licenses in an organization. Vouchers are purchased directly from Aveo Systems or from an authorized distributor. Vouchers may be redeemed for a Mira Portal user or transferred to another user for them to redeem.
Monthly and Yearly Subscriptions - A room license that is automatically renewed and billed at the end of the period. A subscription can be canceled at any time.
Prepaid License - A room license that is purchased for a fixed number of rooms for a fixed number of years. Prepaid licenses may be extended to additional rooms or additional years of service.
Redeem - Converting a license voucher into a license that will be associated with a particular organization.
Room License - Entitlement for specific features for a room that is purchased for an organization and assigned to a room. A room license is required for Mira Connect Software to control real equipment. Room licenses can be purchased in any quantity.