 Mira Connect is the smart room controller that sets up quickly and doesn’t require any programming. Each Mira Connect is configured and provisioned through Mira Portal, our cloud management platform, and requires wide-area network (WAN) access in order to access its initial configuration from Mira Portal.
While most installation sites allow continuous access to the WAN on their AV network, some sites allow only temporary WAN access or no WAN access at all. How does this affect Mira Connect?
Once initially configured, Mira Connect will work perfectly well as a room controller without on-site WAN access. Here are scenarios when you will need Mira Connect to access the WAN after the initial configuration:
- Making a subsequent change to a Mira Connect’s configuration – adding or removing equipment or functionality – or using Mira Connect in a different room than originally configured
- Updating the firmware of a Mira Connect
- Accessing the remote control capabilities to be able to control a Mira Connect from anywhere
- Receiving text messages about equipment going offline or online
- Utilizing Office 365 Calendar functionality for one-touch dialing
On-Site WAN Access Available All the Time
For customer sites that allow WAN access, no special preparation is required. See the following instructional guides to assist you with Mira Connect set up:
- the Quick Install Guide that came with the Mira Connect
- An Administrator’s Guide (for further details)
- A series of short online training videos to help you with set up
- The Mira Connect Network Considerations Guide
- Our equipment integration guides
On-Site WAN Access Available Only During Set Up
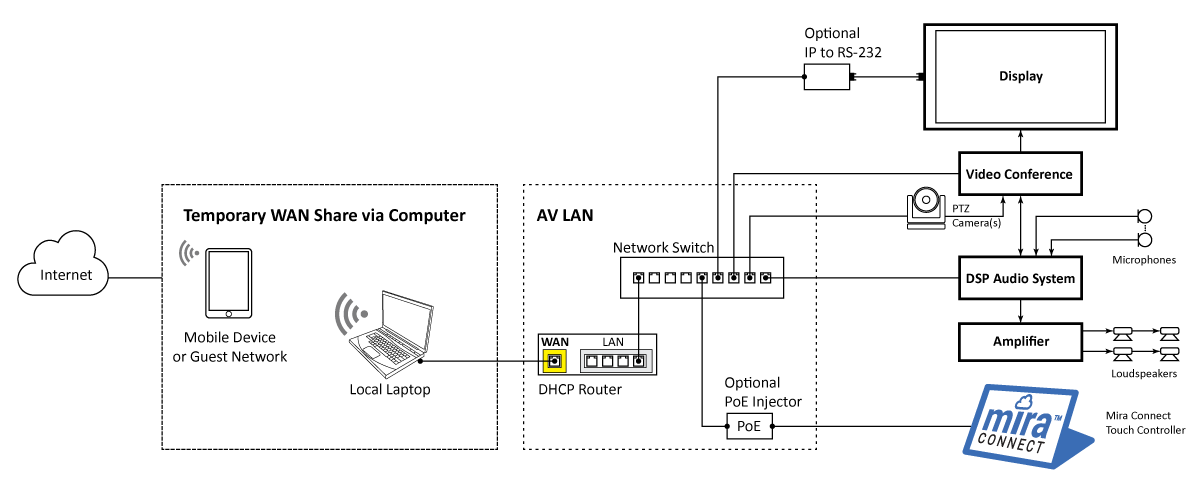
A typical network connection diagram is shown below with a local AV LAN switch connected to a DHCP router. The yellow WAN connection of that router connected — at least temporarily — to the client’s network or to a dedicated network that has WAN access but doesn’t connect to the main corporate network.

Some customer sites only allow temporary WAN access during the installation. This access will be either through a guest wireless network shared with their AV network or by temporarily sharing a mobile phone’s WAN access with a local router as shown in the figure below.
If you have temporary access to a customer’s WAN through a guest wireless network or mobile phone, please refer to our application note on Sharing a PC Network Connection. This guide shows how you can share your PC’s or mobile phone’s wireless network connection to provide WAN access for the wired network used to configure Mira Connect.
No On-Site WAN Access Available
For customer sites that do not allow any on-site WAN access, Mira Connect must be initially configured at an off-site location with access to a WAN, such as at the integrator’s site.
IMPORTANT NOTE: To pre-configure Mira Connect at an off-site location, you will need to know the IP address of each piece of equipment to be controlled by Mira Connect. In addition, you will need to know the control points for each piece of equipment, such as the instance tag to use for muting microphones.
As the equipment to be controlled is located on a different network, Mira Portal will correctly indicate a ‘Connection Failed’ message when trying to connect to the equipment. Once connected to the DHCP server on the client’s AV network, Mira Connect will immediately start controlling the equipment as configured. See the following example for how to do this.
Configuring Mira Connect Off-Site Prior To Installing It On-Site
In this example, we’ll configure a Mira Connect that will eventually be used at the client’s site on a network (we’ll assume the client’s network is 192.168.0 in this example) that has no WAN access. We’ll pre-configure the Mira Connect at an off-site location that has WAN connectivity. Let’s call the off-site WAN-enabled network 192.168.81.
1. Connect Mira Connect to the local network
Plug the Mira Connect into a PoE-enabled network connection on the 192.168.81 network. A DCHP server is required for Mira Connect to get an IP address. You can use a wireless or wired network connection.
2. Log in to Mira Portal
Using your computer, browse to Mira Portal, login, and add the customer’s organization, site, and room information into Mira Portal. Then, within Mira Portal, pair the Mira Connect to the room in which it will be used. (See our training videos for more information about creating an account on Mira Portal and adding the organization, site, and room information.)
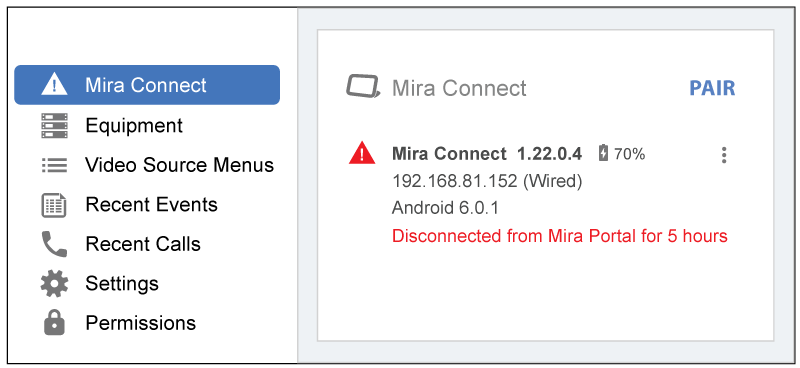
Once you have paired the Mira Connect to Mira Portal, the status will appear on Mira Portal as in the figure below.
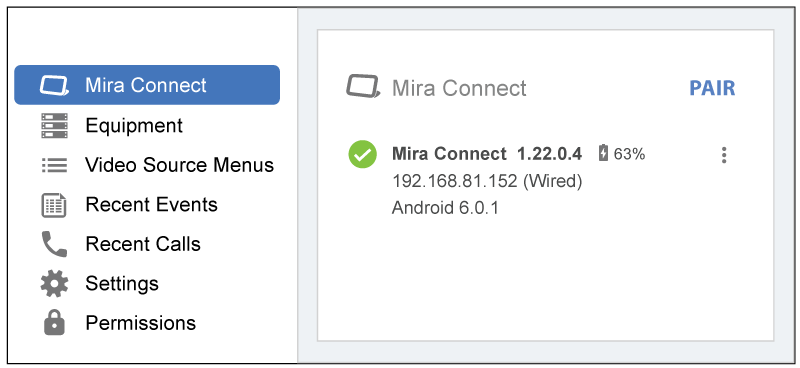
In this example, the Mira Connect has acquired an IP address of 192.168.81.152 on the off-site network.
3. Add Equipment to Mira Portal
Now you are ready to add the equipment that Mira Connect will be controlling. Remember, you should already have determined the IP address and control points of each piece of equipment that will be controlled by the Mira Connect.
In this example, let’s connect a Biamp TesiraFORTÉ DSP audio device that is located in the customer’s room and will use an IP address of 192.168.0.145 on the client’s AV network. Within Mira Portal, select ADD EQUIPMENT in the proper room, select the TesiraFORTÉ from the pulldown menu, and add the IP address in the appropriate CONNECTION field, as shown in the figure below.

Next, select AUDIO CONTROL and edit the control settings and manually enter the instance tags that are programmed into the TesireFORTE, as shown in the figure below.
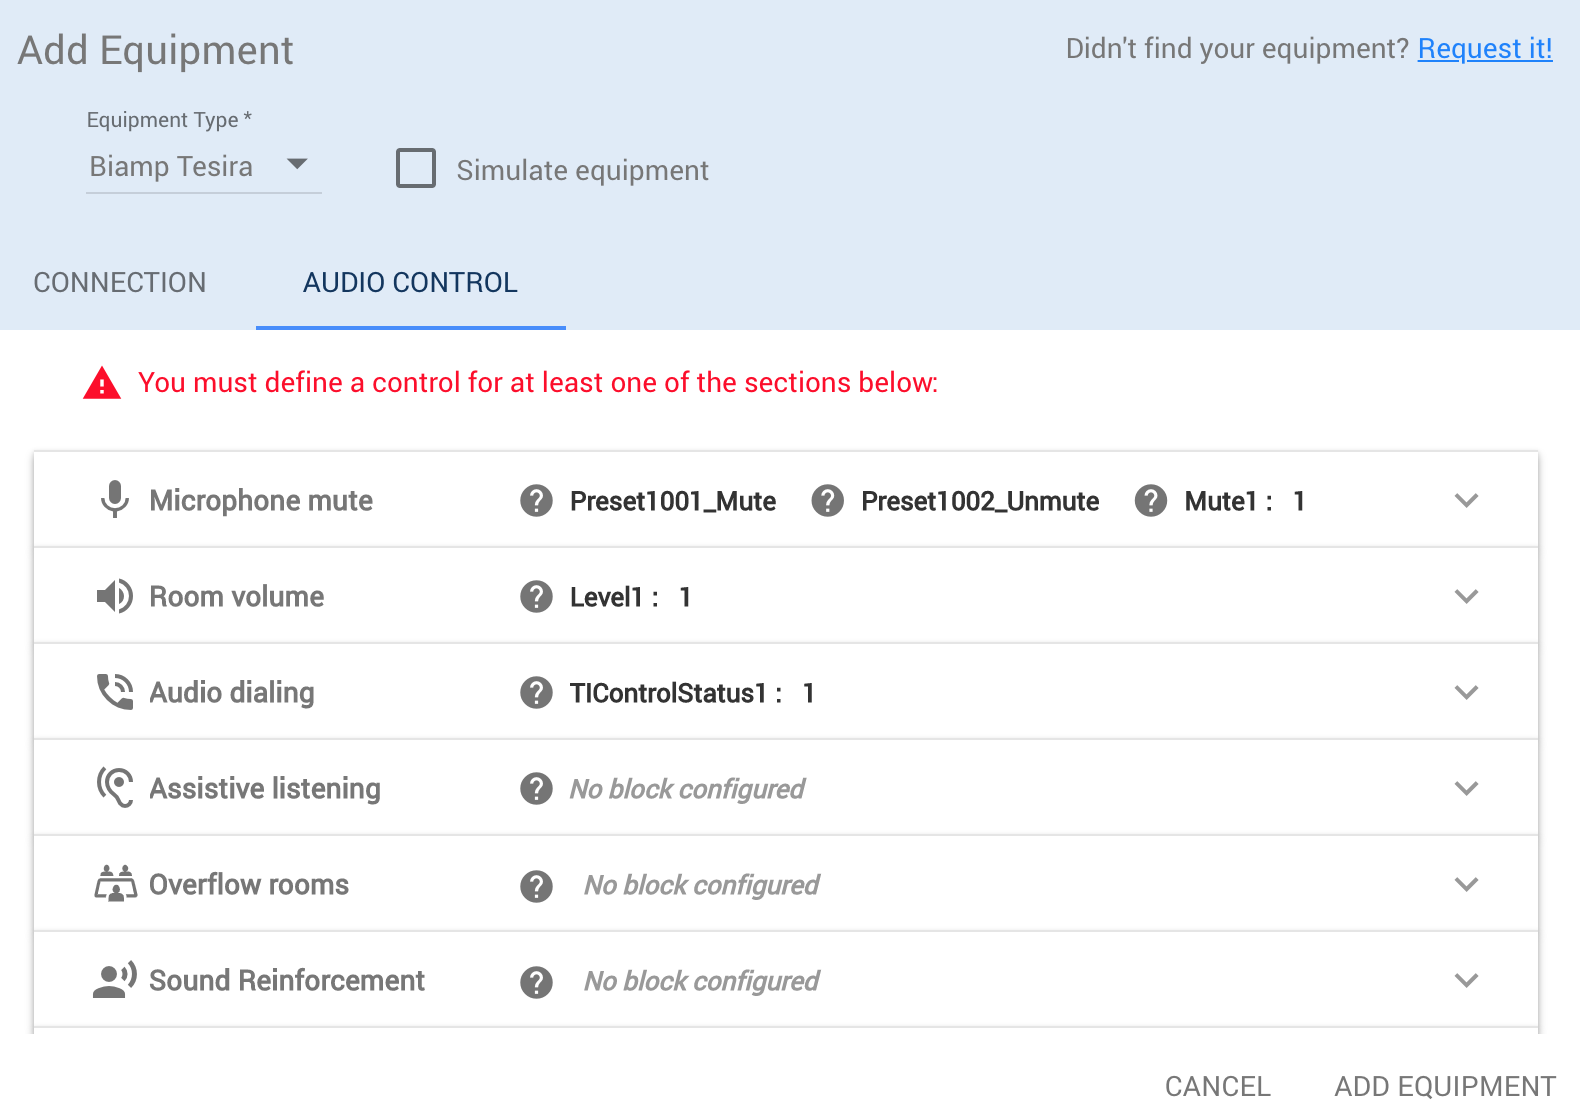
Once you have entered all of the TesiraFORTÉ settings in Mira Portal, select ADD EQUIPMENT on the bottom right of the window to save the settings.
NOTE: If the Mira Connect had a network route to IP Address of the TesiraFORTÉ it would be able to communicate with the TesiraFORTÉ and automatically retrieve the instance tags. Since this example shows the Mira Connect being pre-configured off-site, away from the TesiraFORTÉ, the instance tags must be entered manually.
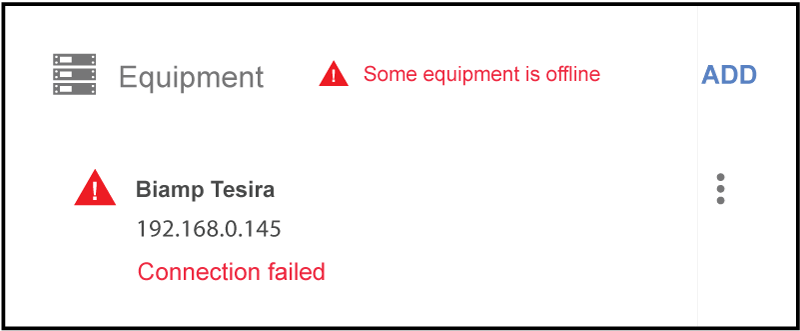
Once you have saved the settings for the TesiraFORTÉ, Mira Portal will indicate that the equipment has been entered. Even if all instance tags were properly entered, Mira Portal will still indicate “Connection Failed” (as shown below) because the Biamp TesiraFORTÉ device is on a different network than the Mira Connect.
Even after you have put the Mira Connect on the client’s network and it is controlling the equipment, this status will not change because Mira Connect won’t have a WAN connection to update its status in Mira Portal.
Using the same approach, add any additional equipment into Mira Portal that the Mira Connect will be controlling in the room.
4. Move Mira Connect to the On-Site Location
Once you have added all of the devices to be controlled by Mira Connect within Mira Portal, power down the Mira Connect if you will be shipping it to the customer’s location. If you are transporting the Mira Connect directly to the customer’s location, you can simply unplug it from its current off-site PoE network connection (in this example, 192.168.81) and plug it onto a PoE connection on the on-site network (in this example, 192.168.0). The settings in the Mira Connect are saved automatically for offline operation.
A DHCP server is required at the on-site location to allow Mira Connect to get a DHCP address (in this example from the 192.168.0 network) and communicate with the equipment.
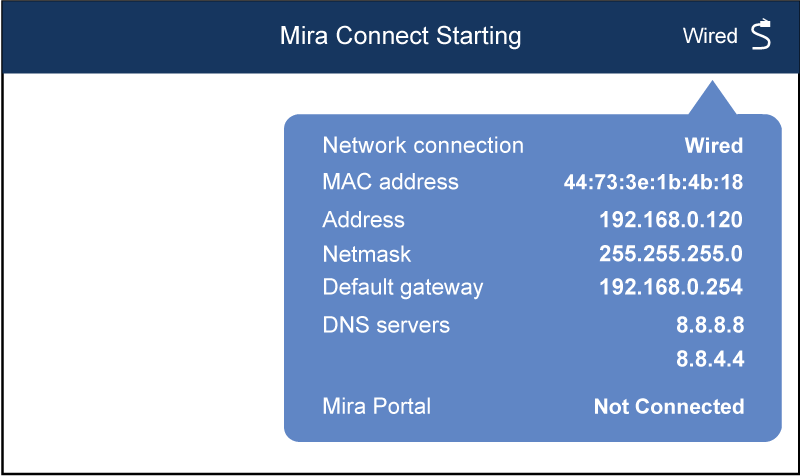
It takes about a minute for Mira Connect to power up and get an IP address from the network. You can see the network connection status by pressing the Wired network icon on the upper right of the Mira Connect screen while it is connecting, as shown in the figure below. Without WAN access, the Mira Portal status will continue to indicate ‘Not Connected.’
Assuming that you have all of the equipment IP addresses and control points set up properly, Mira Connect will begin controlling the devices as configured. That’s it, you’re ready to go!
NOTE: If any of the IP addresses used for the equipment on the on-site network (in our example, 192.168.0) are incorrect, changes can be made in Mira Portal. The Mira Connect will need to re-connect to the WAN again to get the updated information.
As the Mira Connect is being used without WAN access at the customer’s location, Mira Portal will show the Mira Connect as offline as shown in the following figure.
Making Changes to a Mira Connect That Is Located at a Site Without WAN Access
If you need to make equipment changes to the actual room or want to get the latest firmware update, you must temporarily add WAN access to the customer’s network or move the Mira Connect back to a network that has WAN access. Mira Connect will connect to Mira Portal as soon as it has WAN access and automatically update to the latest version of software.
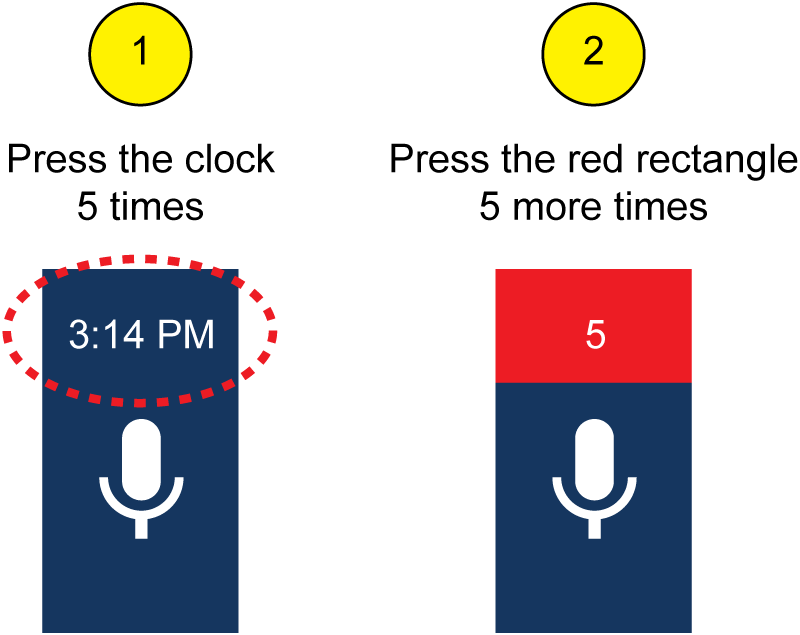
After you reconfigure the system, if you want to see the network connection status, follow these steps:
- Press the clock on the upper right of the Mira Connect screen 5 times quickly until it turns red. Then press it 5 more times to get to a System Information page.
- Press the Wired network icon in the upper right corner as shown previously.
- Press the back arrow to go back to controlling the system OR wait approximately 1 minute for the system information page to time-out and default back to the control user interface.
Summary
Mira Connect is easy to set up using Mira Portal, our cloud management platform.
While Mira Connect requires WAN access for its initial configuration, for installations where there is no WAN access allowed, you can pre-configure Mira Connect before bringing it on site. Simply connect Mira Connect to a network with WAN access to configure it, and then move it to the network that doesn’t have WAN access. A DCHP server is required for Mira Connect to get an IP address on any network that it is on.
Mira Connect will readily operate as a control system without ever needing to connect to Mira Portal again, unless you want to update firmware, change the equipment configuration, use the remote control capabilities, get text messages with equipment status, or use the Microsoft Office 365 calendar integration for one-touch dialing.
To learn more about Mira Connect, see our website and training videos or contact us at sales@aveosystems.com