Mira Connect Self-Guided Tour

Mira Connect is a leading smart control system that makes it easy to control the AV equipment in your room with options for managing displays, controlling lights, adjusting audio levels, changing channels, dialing audio and video calls, and controlling other AV equipment.
Unlike traditional control systems, you can create a completely configured control system with an intuitive user interface without having to do any programming.
To configure a system, add the equipment in Mira Portal, enable the options you'd like to use, and the UI is built automatically for you. Available for tabletop or wall mount, Mira Connect looks great in any application. See our training videos for how to get started.
To experience Mira Connect's user interface with this demo, click anywhere in the touchscreen image on the left (wherever the cursor changes to a hand ![]() ) and see what it does.
) and see what it does.
You'll see example screens of what you would be able to control, just as with a fully-integrated Mira Connect.
To see the Mira Connect user interface larger on your screen, expand your browser window.
To contact us for a personalized demo or with application questions, click the orange button shown at the top of each demo page.
If you'd like to give us feedback about whether this tour was helpful, please click the blue button shown at the top of any of the screens for a simple yes / no selection and optional comment about how we could improve the tour.
To return back to this starting page, click the Return to Beginning button. To see the brands of supported equipment, click the Show Supported Equipment button.
Customize the Visual Theme
Users can customize the background image, logo, and background colors in site settings in Mira Portal to match their organization's branding.
Changes to the visual theme automatically affect all rooms in the site, making it easy to update one room or thousands of rooms at the same time.
You can edit the visual theme settings in Mira Portal and upload a background image and logo.

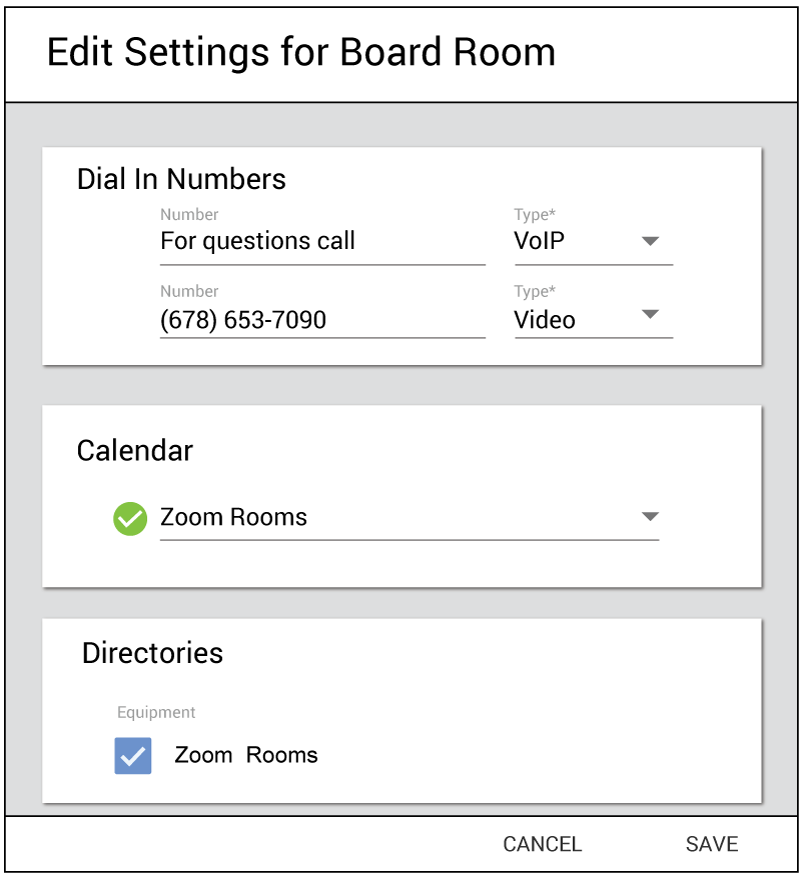
Customize the Room Settings
Users can customize the room name and add phone numbers or video numbers of the room or other information to show on Mira Connect.
Users can also choose the room's calendar source for showing upcoming meetings and also enable one or more contact directories to make it easy to dial users.
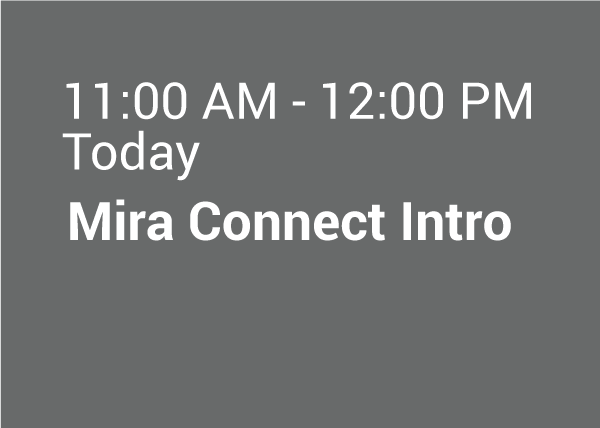
Upcoming Meetings
When the room is invited to meetings, the room's calendar items will appear on Mira Connect.
Users can scroll forward to see upcoming meetings and view meeting information from the invitations.
The current meeting will be highlighted and shown in the center of the touch screen for easy dialing.

Calendar Integration
When a room's calendar is integrated with Mira Connect, Mira Connect displays upcoming meetings and highlights the current meeting, making it easy for users to join the meeting. The calendar's source can be an Office 365 account for the room, or a calendar from a video conferencing system such as Zoom or Poly.
![]() The video dial button makes it easy for users to start Zoom meetings and dial traditional video codecs, such as Poly and Cisco video conferencing systems, with one touch.
The video dial button makes it easy for users to start Zoom meetings and dial traditional video codecs, such as Poly and Cisco video conferencing systems, with one touch.
![]() The phone dial button allows users to start audio conference calls with one touch.
The phone dial button allows users to start audio conference calls with one touch.
Calls can be dialed from the DSP audio solution (analog telephony or voice over IP) or from a Zoom Rooms' phone line integrated with Zoom Phone or other SIP telephone provider.
To make it easy to join meetings, meeting passcodes and bridge numbers are dialed automatically when they are part of the meeting invitation.
Users can press MORE CALLING OPTIONS... to see if there are additional calling options available in the meeting invitation.
More Calling Options
A meeting invitation will typically include multiple ways to join a meeting including a video number and one or more telephone numbers.
To see more information from the meeting invitation, press DIAL MANUALLY... .
To go back to the original meeting card, press the back arrow.
Meeting Invitation Details
Users can see all the information from a meeting invitation including the meeting title, location, attendee list, agenda, and all dialing information.
A dial pad is presented so users can manually dial an audio or video call directly from the meeting invitation information.
Once the audio or video number has been dialed, press the appropriate dial button to launch the call. In this example, because there is a Zoom Rooms system, the video button is labeled JOIN ZOOM.
Press the JOIN ZOOM button to launch a Zoom call or press the DIAL PHONE button to dial an audio call.
Dialing Audio Calls
![]() Once an audio call is dialed, any meeting codes found in the meeting invitation will be dialed automatically.
Once an audio call is dialed, any meeting codes found in the meeting invitation will be dialed automatically.
Users can adjust the incoming call volume level by pressing the loudspeaker icon on the calling card ![]() .
.
To manually enter additional digits, press the keypad icon ![]() on the calling card and enter additional digits as necessary.
on the calling card and enter additional digits as necessary.
Users can hang up the call by pressing the hang up button ![]() .
.
Adjusting Audio Call Volume
If the sound from remote participants isn't loud enough or is too loud, you can adjust the level of the incoming call up or down for a more comfortable listening level without affecting other audio levels in the room.
If users need to enter additional digits, they can press the keypad icon ![]() on the calling card.
on the calling card.
Users can hang up the call by pressing the hang up button ![]() .
.
Dialing Extra Digits
![]()
The digit keypad allows you to enter additional digits for navigating remote phone system menus or entering bridge codes and meeting passcodes.
Users can hang up the call by pressing the hang up button ![]() .
.
Using a Contact Directory
Directories make it easy to launch audio and video calls with people in your organization or the people you contact the most.
When using Zoom-based systems, users can start a meeting immediately by selecting users from the Zoom directory, setting the meeting duration, and pressing MEET NOW ![]() .
.
If users have uploaded a directory of audio and video conferencing contacts and numbers, a PHONE directory will also be available. Press the PHONE directory header to see your directories and dial calls.
Selecting a directory entry shows the uploaded contact information and numbers.
Press a contact to select it and then select how to dial the participant to launch a call.
See our directory article for more information about creating and uploading contact directories. More than one directory can be uploaded and assigned to a room.
Create Your Own Contact Directories

Users can search and select an entry from their custom directory and dial the contact by selecting the desired number to dial.
See our directory article for more information about importing your own directories for easy dialing. It's easy to export your contact lists into a CSV file from Outlook or Gmail, or create your own list of numbers to dial.
Press the ZOOM directory header to return to the Zoom directory or select a user to call.
Dialing Directory Contacts
You can search and then highlight a user to dial. Select how you'd like to dial the contact and the call can be launched.
In this example, click the Work number to launch a phone call. Mira Connect will automatically dial the bridge numbers and passcodes.
See our directory article for more information about creating your own directories for easy dialing.
Press the ZOOM directory header to return to the Zoom directory or select a user to call.
Dialing Phone Numbers
If the equipment in your system includes a telephone interface or a video conferencing system from manufacturers including ![]() ,
, ![]() , or
, or ![]() , you can dial other people directly from Mira Connect.
, you can dial other people directly from Mira Connect.
Users can directly enter phone numbers by pressing the digits of the call and then pressing the dial phone ![]() or the video button
or the video button ![]() to launch their call. You can also dial phone or video numbers from a directory or directly from a calendard invitation.
to launch their call. You can also dial phone or video numbers from a directory or directly from a calendard invitation.
Video or audio number strings that include text can be dialed by pressing the keyboard icon ![]() .
.
Participant Hand Raising
When a Zoom meeting participant raises their hand, Mira Connect's participant list is updated and animated on Mira Connect.
If there are LED bars installed, the LED bars will alternately flash blue and green for a few seconds to catch the presenter's attention.
The LED bars would normally be green when in an active call when the system is unmuted and red if the system is muted.

Participant Hand Raising
When a participant raises their hand, Mira Connect's participant list is updated and animated on Mira Connect.
If there are LED bars installed, the LED bars will alternately flash blue and green for a few seconds to catch the presenter's attention.
The LED bars would normally be green when in an active call when the system is unmuted and red if the system is muted.
Changing the View
Zoom Room users can change their local view to show the meeting participants in different ways on their displays.
The options available depend on the number of participants in the call.
Recording Consent for Zoom Video Calls
With newer versions of Zoom Rooms, if the meeting you are joining is being recorded, you are prompted to consent to the recording or leave the meeting.
Mira Connect makes it easy to choose whether it's ok to continue and join the meeting or leave the meeting if you don't agree to being recorded. Once you join the meeting, a recording status will remind you the meeting is being recorded.
If the meeting you are joining is not being recorded when you join, you won't see this option.
Launching Zoom Video Calls
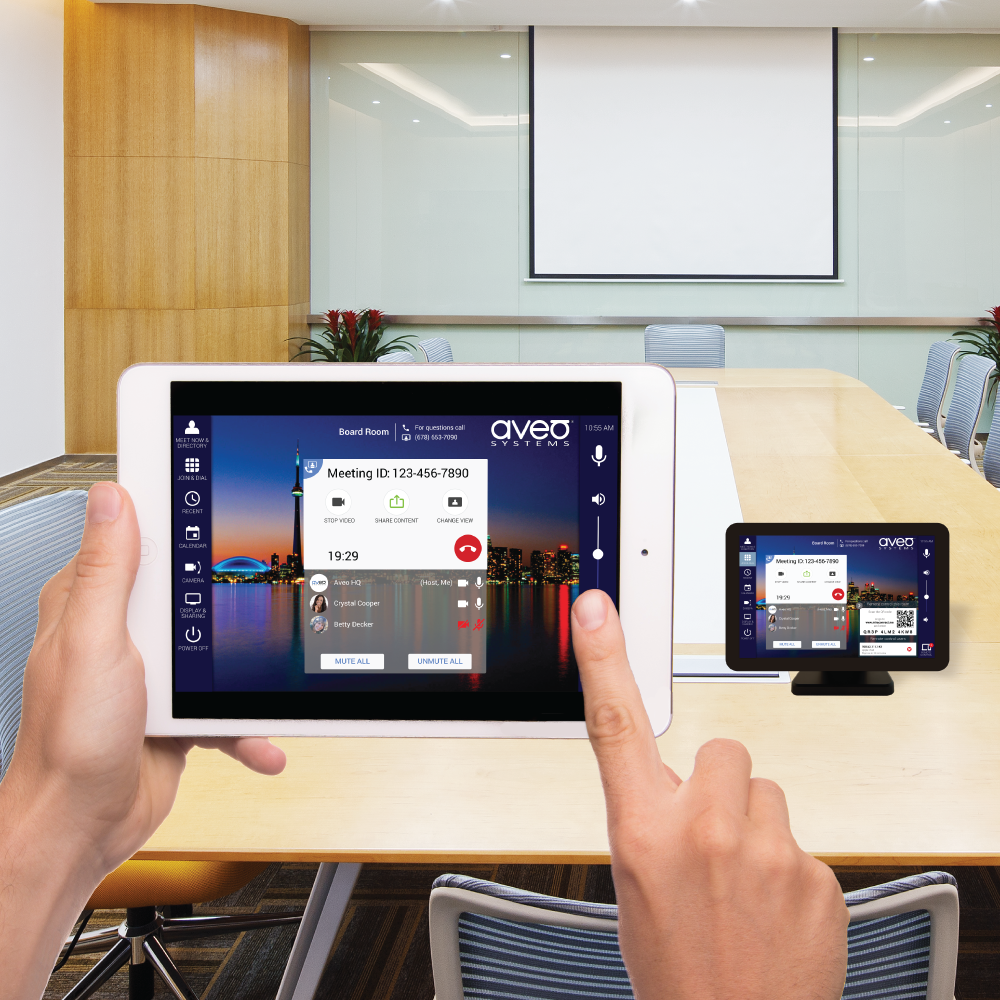
![]() Mira Connect can join a Zoom call and will show a Zoom call card once the call has connected. If a meeting password is required, a password prompt will appear automatically. If the meeting is already in progress and is being recorded, the user is prompted to consent to the recording or can leave the meeting.
Mira Connect can join a Zoom call and will show a Zoom call card once the call has connected. If a meeting password is required, a password prompt will appear automatically. If the meeting is already in progress and is being recorded, the user is prompted to consent to the recording or can leave the meeting.
The list of participants automatically updates as users join or leave the call.
If your Zoom Rooms system is the meeting host, the 'Mute All' and 'Unmute All' buttons allow the meeting host to manage mute for all the participants. You can also request that participates start their video camera.
If any of the participants raise their hand during the meeting, a visual indicator appears and animates on Mira Connect, as shown here, to make it easy to see that someone has a question. This is ideal for classrooms to ensure the remote students can also ask questions.

Users can start/stop video content, share content, change their view of the remote participants, invite new participants, or hang up the call.
Mira Connect can dial traditional video conferencing systems from ![]() and
and ![]() too.
too.
Do you have a different video conferencing system you'd prefer to use? Let us know and we can work with you to add support for it.
Zoom Meeting Details
 Once a Zoom call is active, you can view the meeting information including the passcode and dial-in information by pressing the 'info' button.
Viewing Recent Calls
You can see your recent calls and then select any one to re-dial.
Select the entry and a dial button will be presented.
Press the join button to dial.
If you'd prefer not to see recent calls, the recent calls option can be disabled in Mira Portal.
Dialing Recent Calls
You can select a recent call and easily dial using the audio ![]() or video
or video ![]() dial buttons.
dial buttons.
If you don't want to see the recent calls, the option can be disabled in Mira Portal.
Camera Positioning

Users can select a camera from the pull down list and then adjust the pan, tilt, or zoom of a camera.
When cameras are controlled directly by Mira Connect or through a Poly or Cisco video conferencing system, users can select from pre-defined camera presets to reposition a camera with one press.
Mira Connect controls cameras directly through the VISCA camera protocol or indirectly through a video conferencing system.
Tuner UI Navigation

You can easily navigate the tuner's user interface including the program guide and menus with the navigation keys.
Channel Favorites

You can define, upload, and rearrange up to 24 channel favorites per tuner using Mira Portal.
Channel images are scaled and positioned automatically.
Managing Displays and Tuners
Mira Connect makes it easy to manage one or more displays for hospitality applications, sports bars, or any space that has one or more displays.
Users can select input sources, turn displays on and off, control the display's blank and freeze features, and adjust volume and mute.
When a display's input is from a TV tuner such as an external cable box or satellite tuner, you can change channels and navigate the tuner's on-screen display.
When you define channel favorites, you can easily upload channel icons and change the channel by selecting a channel favorite.
Multiple displays are shown in a tabbed view, making it easy to control an unlimited number of displays.
Optional scrolling arrows appear when there are more than five displays.
Channel Keypad

Users can directly enter channels numbers and optional dashes and press the enter or check key when done.
Channel favorites, previous channel, and channel up/down can also be used to change channels.
Previous Channel
 Users can easily change back to the previous channel.
Channel favorites, direct channel entry, and the channel up/down buttons can also be used to change channels.
Channel Up/Down
 Users can channel surf with the channel up and down buttons.
Channel favorites, direct channel entry, and the previous channel button can also be used to change channels.
Managing Displays and Tuners
Mira Connect makes it easy to manage one or more displays, including selecting input sources, turning displays on and off, controlling the display's blank and freeze, and adjusting volume and mute.
When a display's input is from a TV tuner such as an external cable box or satellite tuner, you can change channels and navigate the tuner's on-screen display.
When you define channel favorites, you can upload channel icons and select a favorite to change the channel.
Multiple displays are shown in a tabbed view, making it easy to control an unlimited number of displays.
Controlling Room Lighting
Users can control individual lights or run lighting presets.
Individual lights may be dimmed by pressing on the desired lighting icon.
In this example, you can press the CONFERENCE preset to adjust the level of multiple lights at once.
Selecting Lighting Presets
Pressing lighting presets can affect all the lights in the room.
In this example, you can press the ALL LIGHTS preset to change lighting levels.
Adjusting Individual Lights
Press the brighter and dimmer lighting icons to increase or decrease the light level for that lighting zone.
The level is is shown as a percentage in the main lighting icon.
Executing a lighting preset will also adjust these levels.
Power Down and Lock the Mira Connect Screen
When you choose to power down the room, if you have a password defined for the room, you can either lock the room (requiring a password to unlock the room) or power down and lock the room.
A password can be set for each room to prevent unauthorized access to the Mira Connect user interface.
![]() If the Room Power off feature is not enabled, there will be a lock room icon that you can use to lock the Mira Connect instead of the power off icon.
If the Room Power off feature is not enabled, there will be a lock room icon that you can use to lock the Mira Connect instead of the power off icon.
Lock the Mira Connect Screen
When locked, the user must enter the password to unlock the screen.
 If Mira Connect Me is enabled, then users can enter the password on their personal device.
In this example, scanning the QR code with your mobile device will bring you directly to our Mira Connect Me article.
Lock the Mira Connect Screen
Once the password has been entered, press OK to unlock the system.
Power Off and Lock the Mira Connect Screen
Once the system is locked and powered off, a touch to the Mira Connect screen will wake up the Mira Connect, allowing you to enter the password for the room.
If you don't want to touch the screen, you can point the camera on your mobile device at the Mira Connect Me QR Code and open the user interface on your mobile device.
In this example, scanning the QR code with your mobile device will bring you directly to our Mira Connect Me article.
Lock the Mira Connect
A password can be set for each room to prevent unauthorized access to the Mira Connect user interface.
Enter the password to access the Mira Connect user interface.
Power Off and Lock the Mira Connect Screen
If a password has been set for the room, the room can be locked or powered off and locked.
Enter the password to show the Mira Connect user interface.
Powering off the room will also dim the Mira Connect touchscreen and reset the audio settings to default volume levels with mute enabled or disabled, depending on your preferences.
Room Power Off
![]()
You can power down your room which will power off all the equipment that supports power control.
If you have a password defined for the room, you can also just lock the panel without powering off the equipment.
Powering off the room will also dim the Mira Connect touchscreen and reset the audio settings to default volume levels with mute enabled or disabled, depending on your preferences.
Room Powered Off
Once powered off, Mira Connect's screen dims and it will become active again once it has been touched.
If Mira Connect Me touchless AV control is enabled, you will see a QR code that can be captured by pointing your mobile device's camera at it.
See our Mira Connect Me article for more information about getting control on your personal device.
You can scan this QR code with your mobile device to go directly to our Mira Connect Me article.
Touch anywhere in the screen to wake the touchscreen up.
Screen Cleaning Mode
By pressing and holding the clock for 5 seconds on a real Mira Connect, you can activate the screen cleaning mode.
 The cleaning mode is active for 20 seconds and shows a count-down timer with the remaining time before the user interface is restored automatically. During this time you can clean the screen without fear of pressing any buttons.
Screen cleaning is perfect for end-of-day tidying up or in between meetings room cleaning.
In this self-guided tour, press anywhere to get out of screen cleaning mode.
Touchless AV Control
Mira Connect Me allows users in the room to take control of the system. When Mira Connect Me is enabled, the QR code will appear automatically on Mira Connect.
Hold your phone's camera over the QR code and then open the link shown on your mobile device.
After validating the code, your browser will show the Mira Connect user interface.
There's no application to download. It's safe, secure, easy, and fast!

See our Mira Connect Me article for more information about getting control on your personal device.
You can scan this QR code with your mobile device to go directly to our Mira Connect Me article.
Room Volume Adjustments
 Users can adjust the volume level in the room by pressing the volume up and volume down icons on the Mira Connect.
Users can also press and pull the volume ball up and down to adjust the volume.
To control additional audio sources, see the Who Can Hear Me feature.
Room Volume Adjustments
Users can adjust the volume level in the room by pressing the volume up and volume down icons on the Mira Connect.
Users can also press and pull the volume ball up and down to adjust the volume.
To control additional audio sources, see the Who Can Hear Me feature.
Muting the System
![]()
Users can mute their local microphones by pressing the microphone icon. Mira Connect is configured in Mira Portal for what to mute when the user presses the mute button.
If you have the optional LED bars installed, the LED bars will light up red when the system is muted, as shown here.
Managing Audio Sources
![]()
Users can control local audio sources, such as wireless microphones, using the Who Can Hear Me option.
Simply press the mute buttons to mute or unmute and press the loudspeaker to adjust the volume.
Muting and unmuting will adjust the channel count for the number of unmuted channels on the Who Can Hear Me icon.
For more information about controlling other audio sources, see our Who Can Hear Me article.
Supported Equipment
Mira Connect supports an ever-growing list of products from major manufacturers.
Click here for a list of supported equipment and detailed integration guides to help get you started.
See our blog posts for interesting articles about supported features such as:
Remote Control for controlling your system from anywhere,
Mira Connect Me touchless AV control for users in the room, and
UI Preview for experiencing Mira Connect from your browser before you have a Mira Connect.
If you don't see equipment that you'd like to use, you can request new equipment here.